Tuesday, November 10, 2009

It's NOT the Great Pumpkin, Charlie Brown!

I wanted to try my hand at another souffle! I felt such satisfaction when I made my last one...since I've heard they are quite tricky to make. And since October for me was "Pumpkin month" (yes, I know it is now November...I'm behind!)...I decided to make a pumpkin souffle!
This was my third try at beating egg whites into foam peaks. I think I'm getting pretty good at it! Some might even say...I'm a pro. ;-) Just kidding! But I'm pretty darn good.
I combined all other ingredients like the directions said...and because everyone that reviewed it said there was WAY too much orange zest (1 tablespoon), I halved it. I then VERY gently folded the "egg white foam" into the rest of the mixture, put it into one large souffle dish and popped it into the oven (might I add for quite a bit longer than the recipe called for)!
I pulled the beautiful souffle out of the oven and let it sit to harden and cool for a little while. It was absolute torture...I couldn't wait to eat the deliciousness!
Casey and I cut a slice...took a few pictures and took a bite!
IT WAS ABSOLUTELY DISGUSTING BEYOND ALL BELIEF!!! Even though I halved the orange zest...I probably should've quartered it or even less. It was OVERWHELMINGLY orangey and bitter. So...very...horrible.
NEVER EVER MAKE THIS! BLEHK!!!!!!

Sunday, November 1, 2009

Pumpkin Spice...is SO VERY Nice!

So, since I declared October "Pumpkin Month"...I wanted to find something super delicious and cute (and of course "pumpkin-y") to bring to work. I stumbled upon this recipe for Pumpkin Spice Cupcakes with Cinnamon Cream Cheese Icing and decided to make little fondant fall leaf/acorn "accents" to make the cupcakes even cuter! The day I found the recipe, I received a Williams-Sonoma catalog in the mail and found these "pie crust cutters"...which I thought would work perfectly with the fondant. Not only do they cut the shapes...they also imprint them as well! I headed to MacArthur Mall in Norfolk to the closest Williams-Sonoma and picked up these little $18.00 cutters (yes...I promise to use them more than once, Mom) and a few other cool items.

Since I wanted to make these cupcakes super cute, I wanted special cupcake liners! After going to Michaels, Ben Franklin and Wal-Mart...we finally found the PERFECT liners at "Factory Card Outlet". I was so very excited! I don't think anything that inexpensive has ever made me so excited. lol. Are these not the PERFECT liners? I think so!

I think this was the first time I've ever made cupcakes from scratch. Normally I just throw together a cake mix and pour the mix in the cupcake pan. Well NO WAY for these. These MUST be made from scratch! I threw all of the ingredients together as the directions said to do...and turned the mixer on high...and covered myself and the counter with the "dry mixture". Why, oh why...do I do these things? A SMART person starts on low....but I...do not. LUCKILY I had just cleaned the counters...so I just gathered the mess and threw it back in the bowl. lol. I didn't have enough ingredients to start over...and I figured...why not? I was hoping and praying that I didn't lose too much of the baking powder and soda that the cupcakes wouldn't rise or turn out.

I filled my new Williams-Sonoma Pancake Pen with the batter for the cupcakes. I figured the batter was about as thick as pancake batter so it would work. I was right...the Pancake Pen worked perfectly and made filling the cupcake liners a breeze! HOORAY!

I then popped the filled cupcake liners into the oven and to my surprise....they turned out wonderfully (although my cupcake liners absorbed some moisture from the cupcakes and turned kind of dark...boo!). I had just created 24 of the most AMAZING smelling cupcakes ever!

While the cupcakes were cooling, Casey kneaded and dyed the store-bought fondant (that's right...I BOUGHT it!). He rolled it out for me and then we went to cutting the shapes with the 18.00 pie crust cutters! They worked WONDERFULLY with the fondant...I was so excited! We made an even amount of each shape and set them out to harden overnight. (We also tasted one since we had never had fondant before, and let me say...I never want to have fondant again! GROSS!)

The next day, I made the cinnamon cream cheese icing that the recipe called for. This...was...some AMAZING stuff. I'm pretty sure it's Casey's new favorite icing! I first tried to ice the cupcakes with my pampered chef icing tool...and it was a big horrible mess. It took WAY too much frosting on each cupcake to make them look nice. Who wants THAT much frosting on a cupcake? Not me! I then scraped the icing off the one cupcake I tried and decided to do this step by hand. It definitely took awhile, but I suppose they turned out okay. I think it was much better this way...because the icing was so sweet, if I would've piled it on it would've overpowered the awesome tasting cupcakes! I then placed a dried "accent leaf/acorn" on each cupcake...and they were as cute as could be!

I packed them all up in my new cupcake carrier and couldn't wait to take them to work the next day. Once I arrived at work, I told everyone about the cupcakes and they were gone before lunchtime was even in sight. Everyone RAVED over these cupcakes! I am now being called "the Betty Crocker of Riverside". I'll take it. (Oh...and everyone took my suggestion and threw the fondant accents away! A few brave souls tried a bite...and then quickly discarded the accents as I suggested!)

Overall...this was a fairly easy recipe and it was definitely worth all the hunting for the perfect tools for the job. I couldn't have asked for a more perfect cupcake! (And PS: Amanda...seriously...how do you love making cupcakes so much? Icing them takes FOREVER! I think I'll stick with baking cakes and let you keep making your amazing cupcake creations!)

Tuesday, October 27, 2009

The UH-MAY-ZING-EST Cookies Ever!

Let me first start by telling Ginny THANK YOU for this recipe! It is my new favorite cookie ever. But then again...I love all things Pumpkin, and my favorite cookie is oatmeal chocolate chip. So basically...this is my heaven!

Ginny gave me her recipe for these cookies and the measurements were approximate. She eyeballs things. I was a little scared that the cookies might not turn out well...so I found this recipe that had exact measurements and was almost identical to Ginny's.
It was a pretty easy recipe...you just throw everything together and fold in the chocolate chips.
I used my new cookie scoop to scoop out uniform cookies!


Just pop in the oven and bake and you'll have the most AMAZING COOKIES EVER. Well, at least in my opinion. YUM YUM YUM! I took these to work and they were devoured! I also think these cookies would make an amazing muffin as well. The texture of the cookies was very muffin-like. I kept calling them "clammy". Next time I might make mini-muffins out of them. Mmmmmm....can't wait! ENJOY!


Sunday, October 11, 2009

Apple French Toast Casserole...of Loneliness.

So, Casey was gone last week and I was MISERABLE and lonely. I don't do well without him. I would list everything I missed about him...but the list would be WAY too long and WAAAAAY too mushy. So, I'll spare you. He knows how much I missed him!

ANYWAY, I invited my mom over to watch a movie, get some dinner, etc. I also asked her to help me make the culinary creation for that week. I had decided on Recipe Zaar's Apple French Toast Caserole earlier that week since I was craving some French Toast! (Side note...if you don't want to spend the time to cook this go to Cracker Barrel and try their new Apple Streusel French Toast like I did this weekend. It's "three slices of our sweet Apple Streusel bread made with bits of real apple, dipped in eggs* and then grilled to a golden brown. Topped with our Cinnamon Apple Dumplin’ syrup and real butter." It's UH-MAY-ZING! It doesn't have the fresh cinnamon apple on top like the recipe...but it's still DARN good! It would definitely be ROCK STAR quality if they made the apples like the recipe calls for and pile them on top!).


Because my mom is my mom...she decided to do the "dangerous parts "of this recipe. First, because she loves me and doesn't want me to get hurt or even have the chance of getting hurt. Second, because she's a tad overprotective. Third, because she knows her daughter VERY well and knows that she is a disaster waiting to happen. My mother classified the "dangerous parts" of this recipe as the peeling/coring and slicing of the apples. She took over these procedures...and did a bang-up job might I add. She had quite a fun time trying to get the core out of the apple...but the slicing was a breeze thanks to my new Oneida Mandolin Slicer Set from Bed Bath and Beyond! It worked like a dream...but I do think that we should've cut the apples a little thicker because they kind of collapsed on each other in the cooking process. I think if they had been a little thicker they would've maintained their round shape a little easier. But...now I know for next time! And there WILL be a next time!


Anyway...like I said, we cooked the apple slices in some butter, brown sugar, water and cinnamon until they were tender.


We then lined the cooked apples and their sauce on the bottom of the 13x9 cake pan.


Unlike the recipe said to do...I sliced the bread and soaked each piece in the egg/milk/vanilla mixture (that's what all the reviewers said to do) and then laid each piece on top of the apple mixture. When I was finished with each piece of bread I poured the remaining mixture on top of and around the bread. Then you pop the pan in the fridge overnight to sit.


The next day I cooked the french toast and it was pretty darn good if I do say so myself. The bread was crispy and the apples warm and "cinnamon-y".


However, since it was only me...I decided to take the remainder of the french toast to work with me the next day, so it went back in the fridge until the next day. I took it to work and sliced it up in small pieces and everyone LOVED it. And I must admit...it tasted SO MUCH better the NEXT day. I'm not sure why...but it was 10 times better! The bread wasn't crispy anymore...but then again, most french toast isn't. The apples tasted even better and I think even the bread absorbed some of their flavor. This is definitely something I would make again but I'd wait until two days later to eat. And next time I make it...I'm going to make sure Casey is here to try it because he'd love it...and I hope some of you try it and love it as well!

Chicken Cordon Bleu by....WHO?

By ME! That's right...ME! I did it! I made Chicken Cordon Bleu!

And yes...I know this blog is like two weeks late, but I cooked EVERY WEEK, I just never got a chance to actually blog each week. So I'll be catching up today! I'M NOT LEAVING THIS HOUSE UNTIL I DO! lol. (PS: Amanda...how do you keep up with your blogging? GEEZ!)

I looked up a few recipes for this adventure and finally settled on this one from foodnetwork.com.

I started off at the Fresh Market to get some beautiful chicken breasts and uber expensive cheese and prosciutto. TEN DOLLARS FOR CHEESE? C'MON! (I later found out from my mother that she replaces these two pricey items with swiss cheese and some very thinly sliced deli ham. I'll definitely try that next time!)
Once home, I pounded out the chicken breasts between two pieces of saran wrap and tried to get them as thin as I could without them falling apart. This is easier said than done!
Once the chicken is nice and thin you lay your prosciutto on top and then cover it with cheese and roll up tightly, using saran wrap (KEEPING IT ON THE OUTSIDE OF THE ROLL) to keep it all tight.


I followed the recipe exactly and seasoned the flour and then mixed all the other ingredients as directed. I then lightly dusted the rolled up chicken breasts with flour, dipped in the beaten egg and then rolled in the bread crumb mixture.


I then put the chicken in the oven for the directed time, but it never browned! I left it in another ten minutes or so...and it still never browned! GRRR! I then put the chicken under the broiler for a few minutes to brown...and boy did they! I guess because the oven was already warm it browned LIGHTNING quick and a little of the breadcrumbs burned. BOO!


I scraped off the severely burned breadcrumbs and it still tasted great. The cheese was melted enough to be wonderful but not too melty to where it runs out everywhere on the plate!


This was a very good and easy recipe...but it left out a few steps I think. According to the reviews I was supposed to wrap the chicken breasts tightly in the saran wrap used to roll it up and stick it in the fridge for a while so it will maintain it's shape better. Mine maintained their shape just fine without this step however. Also, everyone else seemed to brown their breadcrumbs under the broiler as well...and the recipe never mentions this. I would encourage everyone to try this recipe...but substitute the ham and swiss cheese so it won't hurt your bank account as much!

Wednesday, September 23, 2009

"Orange You Glad I Made This?"

I have officially stumbled upon the MOST AMAZING RECIPE FOR CHEESECAKE EVER CREATED! I'm talking...the Cheesecake Factory should probably beg the lady who created this for the rights to it...it is TOO GOOD!

What is this magical recipe you may ask? Orange White Chocolate Cheesecake from Taste of Home! I made this recipe last weekend to take to my parents' yearly picnic/cookout with their "Old Fart Bible Study Group" at church. And yes, that's what they call themselves sometimes...so I'm not being mean. Anyway, this dessert was seriously GONE in less than 10 minutes. It was BEAUTIFUL so everyone wanted to try it...and they all just RAVED about how wonderful it was. I must admit...it was the best cheesecake I've ever had!


I went out and bought a springform pan from Bed Bath and Beyond to do this Cheesecake. I had never used one before. I was rather shocked when the bottom dropped out while I was playing with it. I didn't know the thing came apart! I brought it home and made the dreaded crust. I...HATE...MAKING...CRUSTS! MOST crust recipies I've tried I normally have to double to get enough coverage of the pan. I was happy that this one had PLENTY of crust mixture to go around...but I just do not understand how to make the sides thick enough to stand up....yet without falling apart! Everytime I added more crust mixture to thicken the sides...the whole side fell down. Finally I got it to stick enough and was as thick as it was going to get...so I was happy. I popped it in the oven and then let it cool for a few hours while we went to dinner and to The Fresh Market!


Anyway...after I came back home I made the cheesecake filling itself. I used my Mom's KitchenAid Stand Mixer that I stole (Okay, maybe I didn't STEAL it. I BORROWED it. But she just doesn't know that I'm never giving it back!) to mix up all of the ingredients. I LOVE THIS MIXER. It makes life much easier, let me tell you! Can you believe that my mother only used it twice in the few years she's had it? I've only had it a few weeks and I've already used it like 5 times! Now I want to buy all of the accessories! It made the process so much easier! I very quickly whipped it all together and poured it into my crust and stuck it in the oven for an hour and 10 minutes. I took it out and LOOK HOW TALL IT GOT? I was shocked at the big tumor in the middle. I kept hoping that the middle would fall so that it would be a lot easier to add the frosting! (I know...since when does somebody want their cake to FALL?)


I let the cake sit and come to room temperature for two hours and then took it out of the springform pan and trimmed the sides of the crust down so it would look even and nice! I think it makes the Cheesecake look so much more "clean". The uneven sides annoyed me!


I then mixed the topping and spread it on top of the cheesecake. It gave the Cheesecake a wonderful glazed look after baking it for 6 minutes and popping it in the fridge for an hour to harden. (This picture was taken before putting it in the fridge.) This topping is what gives the Cheesecake it's orange flavor. There's NOTHING orange in the actual Cheesecake filling...just the topping! It makes the Cheesecake more light and refreshing!


After letting the topping harden for an hour I took the Cheesecake out of the fridge and decorated it with the mandarin orange segments. What a BEAUTIFUL addition! I then put it in my "cake carrier" and popped it back in the fridge overnight (the recipe says for at least 4 hours...but after all the waiting for this Cheesecake off and on....it was bed time for me!).


Overall, this was a BEAUTIFUL Cheesecake and it tasted JUST as good as it looked...if not BETTER! The filling itself was very fluffy and the topping made it refreshing and light almost. This will definitely be something I'll make again when I have A LOT OF TIME...and want to impress people!
***UPDATE*** I almost forgot the MOST important part! Well, at least to me! It the process of moving the cheesecake from the sheet pan under the spring form pan that the recipe calls for...my knuckle scraped the 450 degree pan and BAM...a blister. I nice big one too! This has inspired me to include an injury/mishap list on my blog. Please look for it and any updates to it...it is located on the right side of the page under the purple "about me" box! Enjoy seeing what a klutz I can be!

Tuesday, September 15, 2009

Hershey's Chocolate World!

Casey and I ventured to MD this weekend to see my good friend Lauren get married and to visit my Uncle Michael and his family. Therefore...no time to cook! Although, I did manage to make some Berry Shortbread Dreams last weekend to take to my parents' house for the holiday. I also took the leftovers with me to work and they were a big hit. They were very good...but the icing was WAY too "almondy" for my liking. The cookie itself was very good...but I think there was way too much almond extract in the icing drizzle. Here's a pic of the cookies (I forgot to take pics during the process because I didn't think I'd be using it for my blog).

While we were in MD, we decided to venture up to PA to see Hershey's Chocolate World! The weather was HORRIBLE and it made the drive up there quite interesting...but we got there and back in one piece. Chocolate World was...neat. I definitely would not go see it a second time, but it was a cool experience. We went on a little "ride" that showed us everything, like where the beans come from and the different flavors in the products, the machinery Hershey uses to produce their products and a lot of fun other stuff. It was pretty cool to learn how it all works! There was also a HUGE candy shop where you could get any type of candy Hershey produces and almost any kind of paraphernalia you could dream of.
And this would be the section to skip if you get grossed out easily. I'm going to share a little "TMI". While in Hershey's Chocolate World...my body proved the link between women and chocolate. I am the girl who has never been "regular" and hardly EVER gets my "time of the month." Well friends, "Aunt Flo" appeared right then and there in the middle of Chocolate World...as if the chocolate gods themselves had summoned her. WEIRD, huh?


We got off of the "ride" and this lady asked us if she could ask us some questions. We said sure...and she wanted to know what kind of candy we had bought or consumed in the last year. She then wanted to know if Casey could be a "taste tester" for her. He jumped at the opportunity! (Can you believe it...my picky-butt husband???) Anyway, he tasted two different types of candy that he told me was apparently a new kind of Jolly Rancher...but with a starburst consistency. He really enjoyed the first one and HATED the second. He had to take a questionnaire about his preferences. It was pretty cool!


While at Chocolate World we also took the "Chocolate Tasting Adventure" where we got to taste different types of chocolate and describe each. Each had a different level of cacao. We learned how the levels of cacao influences the taste, "sound" and smell of each of the chocolates. I must admit when they weren't trying to make things "cute and family friendly" it was pretty interesting.


We left Chocolate World and headed to the Hershey museum where we learned about the life of Mr. Hershey. I was not impressed...but I think Casey thought it was interesting. I thought the coolest part was in the gift shop where they had a MASSIVE amount of Chocolate Recipe Books! I went through a few and they were pretty awesome. There's no use buying one though...because Casey isn't a huge chocolate fan!


By the time we were done with Mr. Hershey's life we headed to The Hotel Hershey for dinner at Harvest. I got a Salmon Burger (it was pretty dry actually) and then I wanted to get something SUPER chocolately for dessert (I mean...c'mon....I'm in HERSHEY, PA!). I then ordered the "All About Chocolate"...and it was AWESOME! The description is, "Five layers of rich moist Devils Food Cake are filled with creamy chocolate mousseline of dark chocolate, milk chocolate, white chocolate and chocolate ganache frosted with a dark chocolate glaze. Every chocolate lovers dream come true." Isn't it pretty? It tastes as good as it looks!


I was also very impressed about the streetlamps in Hershey. They were SO VERY COOL! Every other lamp was a wrapped Hershey kiss...and then the others were the chocolate kiss. HOW AWESOME IS THAT?


Anyway, other than Hershey...we went to Lauren's wedding and also "stalked" Frank (the creator of Postsecret) by visiting his mailbox and taking pictures! We didn't really get to see a lot of my family while we were there...they were busy and we were too! But, I know that we'll see them again soon so it's okay. I can't wait to spend more time with them!


To see a few more pics of our trip to MD, Lauren's wedding, Hershey's Chocolate World and Frank's (the Postsecret creator) mailbox...go HERE.

Sunday, September 6, 2009

Mission Impoachable???

Ever since seeing the movie, "Julie & Julia" I knew I wanted to try my hand at poaching an egg. I decided this week that today would be the day! I combed through different recipes including a poached egg and decided that I would try my hand at eggs benedict. Neither Casey or I have ever had eggs benedict, but I've always wanted to try it. I went to foodnetwork.com to try and find a good recipe. I looked through each recipe and finally selected this one because it seemed to have the best reviews for hollandaise sauce. Most were rated as "too eggy" or "too buttery". This one had wonderful reviews, so I printed it out and headed to the store!

Can you believe that only these few ingredients can produce eggs benedict with hollandaise sauce? I thought it would be a lot more!


I started off by "browning" the canadian bacon. I could only find this presliced/prepackaged canadian bacon...and I chose the sweet maple because I love the extra taste of maple in my breakfast foods. It was DELICIOUS!

Next I started making the hollandaise sauce. First you whisk the lemon juice and the egg yolks vigorously until they double in size. WHEW! Talk about sore arms! Then you transfer the liquid into a double boiler and slowly whisk in the melted butter. Once it is incorporated you vigorously whisk again until the sauce thickens and doubles in size again. Good Lord...my poor arm! lol. But, it turned out well...and I was psyched.


Next, on to POACHING EGGS! *dun dun dun* I was VERY intimidated about the process so I watched this video of Alton Brown poaching eggs quite a few times. I followed his instructions exactly (except the part about the water being 190 degrees exactly...because I didn't think I had a thermometer to use). The first batch turned out well I thought, but then Casey mentioned that he had a meat thermometer, so I did the process a second time just so I could make sure that the eggs were fully cooked! I'm a little scared about food poisoning since I had it once my Junior year of college and thought I was going to DIE (thanks to the Panera on Jefferson for that...ugh!). Anyway, the second time worked just as well as the first...but I felt a little better about eating the eggs this time since I knew the water was at the exact temperature! These pictures are actually of the first batch...I forgot to take a picture of the second batch before I made the eggs benedict!


I popped the english muffins in the toaster really quickly and then assembled the eggs benedict! I felt like my hollandaise sauce might've gotten a little thick while I was poaching the eggs...but it still worked. I spooned it over the eggs and VOILA...EGGS BENEDICT! I was so proud! Isn't it pretty? My very first try at poaching eggs and I did it! HOORAY! And you want to know the very best part? CASEY ATE IT! My pickybutt husband actually ATE IT! I just knew that he was going to hate it and I would've gone to all that trouble for nothing! But he surprised me and I'm very happy that he ate it! YAY!

Monday, August 31, 2009

Casey's Birthday Banana Cream Pie!

My husband's 29th birthday is today (yeah...he's old. KIDDING!). I started asking him a few days ago what kind of "birthday cake" he wanted and gave him a while to think. He reports to me yesterday that he wants a banana cream pie for his birthday! Having never made a cream pie anything before I instructed him to find me a recipe while I made the week's shopping list.

Casey came back with this recipe for Banana Cream Pie!
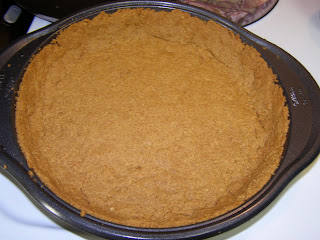
You start off making the pie crust with graham crackers, butter and a little water. This is all well and good....until you go to mush it in the pie pan and realize that the crumb mixture barely covers the bottom...and I do mean BARELY. The recipe says to mush the crumb mixture a half inch up the sides! Well, to do that it would take a miracle...or more ingredients. So, after my second batch I finally get sides to my crust and can thicken the bottom crust a little since you could read a newspaper through it from the first batch alone! I popped it in the oven for 10 minutes and TA-DA!


The next step was very infuriating! I went through 3 packs of unflavored gelatin to get it to dissolve correctly. Basically you added a pack of unflavored gelatin powder to 3 tbsp of boiling water and stir to dissolve. Easier said than done might I add! All I kept getting was a big clumpy mess. No matter which way I tried it, it was a disaster! Finally after throwing a mini-fit I got it dissolved enough...or ran out of patience. One or the other...and I'll let you guess which.


Casey helped make the "pudding" part of the pie while I was throwing my mini-fit, and he did a good job! It turned out perfectly and I guarantee I would've never lasted "stirring for 10 minutes, constantly." Aren't husbands great? While he finished the pudding mixture and let it cool slightly I decided to get fancy with the banana slices in the bottom of my pie! While nobody but you will see it...I decided it was the thought that counts, right?


We then poured the mixture over the bananas and let it sit in the fridge and harden for 3 hours! After hardening I made the "whipped cream mixture" to decorate the cake. To get enough to decorate around the sides of the cake and make a few decorations I had to TRIPLE the ingredients! (Is it just me or did the recipe writer smoke a little somethin' before writing all of this mess down?)


Don't judge me on my lack of "piping" skills. This is the first time I've used my new Pampered Chef "Easy Accent Decorator." And while my piping skills OBVIOUSLY need some work, I have to say the use of this tool was rather "easy" to use and I got the hang of it rather quickly. Next time I promise I'll try to make it not look so horrible...but then again...this blog is about being a klutz, so you get to see my failures as well! Aren't you lucky?


We let it sit overnight...because Casey wasn't allowed to eat his birthday "cake" until today! Anyway, I sliced it up...and it was...okay. I think my bananas should've been a little more ripe. They were quite tart! Other than that, I think it worked quite well...if only because Casey actually ate it!

Anyway, it was a nice little adventure...just challenging enough without having the urge to pull out my hair. I'll try to make anything once for my wonderful husband...and I'll even try making this one again! I LOVE YOU HONEY....HAPPY BIRTHDAY!

Sunday, August 30, 2009

Here Souffle, Gone Tomorrow!

Last week, my husband Casey and I were watching Alton Brown's "Good Eats" on Food Network. (Casey is addicted to this show and I find it very entertaining!) This show was about "bubbles", and Alton was making a cheese souffle. Casey mentioned that he had never had one and I figured, hey...this looks complicated enough, lets see if I can make one!

We looked up the recipe for Alton's Cheese Souffle online and went to find a souffle dish and all the ingredients!
I laid out all the ingredients and got to work!

It was a little hard to get the cheese to melt over no heat like the recipe said...so I cheated and put it over heat and we finally got it to melt! HOORAY! I had also never had to separate egg yolks and whites, so that was quite special. I got the hang of it after the first one though...it took some skill.

We poured the mixture in the prepared souffle dish and popped it in the oven...waiting anxiously to see how horribly I had screwed this up. After 30 or so minutes I peeked in the oven and IT ACTUALLY WORKED!!! I was pretty shocked....if you can't tell. Just look at how tall it got! I was SO PROUD!


We took it out and it fell just a little, which it was supposed to do. It looked just like it was supposed to, I didn't screw it up! Nothing I make EVER looks like the picture! Isn't it pretty?


Here's a pic after we sliced it up! I have had a souffle before so I knew what to expect, but I'm not the biggest fan ever of sharp cheddar cheese so it wasn't my favorite. Casey was okay with the souffle itself, but we want to try another one WITHOUT the sharp cheddar cheese. It's a little "sharp" for us. hahaha. Anyway, I want to make another! Anybody have any recipes for me?

Welcome to My Blog!

I have been inspired by my friend Amanda and the movie Julie & Julia to start my own "food/cooking blog". I invite you, whoever the heck you are, to share in my culinary adventures!

Over the past year I have been trying more new and exciting "culinary creations" that I've either thought up by myself or seen on TV/in magazines/found online. Please feel free to suggest recipes for me to try! I don't promise many successes, because I am quite a klutz...hence the blog name. If there is something within a 12 mile radius...I will find it and trip over it. I am always finding new ways to injure myself.

Since I have recently acquired a new "big girl job", I'm rather exhausted when I return home each day. My goal is to share with you one dish a week that I feel is at or above my level of cooking. I promise to share EVERYTHING with you: my opinions, reviews, questions, comments, accidents and disasters. When I get the chance, recipes and pictures will be included.

Here are some pictures of a few "culinary creations" I have made in the past year. A big thanks to my amazing husband for helping in the creation of each of these dishes, cleaning my messes and of course helping to eat the food!

Amanda's French Toast


Crepe w/ Blueberry Sauce


Blueberry Cream Cheese Braided Loaf